Difference between revisions of "Guide To Technomancy ErisEn"
| Line 1: | Line 1: | ||
| + | '''Status: Ported construction from bay12, currently testing all construction methods for corrections''' |
||
| − | '''This page is under maintenance and will be finished Soon''' |
||
[[File:Technomancers.png|400px|right|Technomancer League]] |
[[File:Technomancers.png|400px|right|Technomancer League]] |
||
| Line 14: | Line 14: | ||
=Construction= |
=Construction= |
||
| + | |||
| + | |||
All Technomancers and their Exultant must know how to build and repair the ship. This section will give you the knowledge of construction, deconstruction, and repair for anyone even the lowly vagabond to learn the basics of Technomancy. |
All Technomancers and their Exultant must know how to build and repair the ship. This section will give you the knowledge of construction, deconstruction, and repair for anyone even the lowly vagabond to learn the basics of Technomancy. |
||
==Machines== |
==Machines== |
||
| + | |||
==Structural== |
==Structural== |
||
| + | |||
| + | ===Flooring=== |
||
| + | |||
| + | {| class="wikitable" style="width: 75%;" |
||
| + | ! colspan="4" | Floors |
||
| + | |- |
||
| + | ! width="150px" | Construction |
||
| + | ! width="200px" | Materials |
||
| + | !Tools |
||
| + | ! Method |
||
| + | |- |
||
| + | | [[File:Lattice.png]] Lattice || 1x [[File:Rods.png]]Rod |
||
| + | |[[File:Welderon 32px.gif]]Welding tool|| {{Divhide|Construction|Color=#AEE9FF}} |
||
| + | # With rods in hand, click on empty space tile. |
||
| + | Used as a basis for plating. {{Divhide|end}}{{divhide|Deconstruction|color=#FFB9AA}} |
||
| + | # Use a welder to deconstruct the lattice into a rod. |
||
| + | {{divhide|end}} |
||
| + | |- |
||
| + | | [[File:Catwalk1.jpg]] Catwalk || 1x [[File:Rods.png]] |
||
| + | ||| {{Divhide|Construction|Color=#AEE9FF}} |
||
| + | # With rods in hand, click on lattice or plating. |
||
| + | Used as a more permanent structure over open spaces or to leave underfloor piping and wiring visible.{{Divhide|end}}{{divhide|Deconstruction|color=#FFB9AA}} |
||
| + | # Use a welder to deconstruct the catwalk into a rod. {{divhide|end}} |
||
| + | |- |
||
| + | | [[File:plating.png]] Plating || 1x [[File:Floor_Tiles.png]]Regular floortile |
||
| + | |[[File:Welderon 32px.gif]] Welding tool |
||
| + | [[File:crowbar.png]] Crowbar |
||
| + | | {{divhide|Construction|color=#AEE9FF}} |
||
| + | # [[File:Floor Tiles.png]] Use a regular floortile on lattice. |
||
| + | ''Blocks air and can be used for further construction.'' |
||
| + | |||
| + | {{divhide|end}}{{divhide|Deconstruction|color=#FFB9AA}} |
||
| + | # Use welder on the plating. |
||
| + | # Use crowbar on the plating to deconstruct into a floor tile. |
||
| + | {{divhide|end}}{{divhide|Repair|color=#abffaa}} |
||
| + | # Use a welder to repair the plating{{divhide|end}} |
||
| + | |- |
||
| + | | [[File:floor.png]] Floor || 1x [[File:Floor_Tiles.png]]any floor tile |
||
| + | |Crowbar|| {{divhide|Construction|color=#AEE9FF}} |
||
| + | # Use any floortile on plating. |
||
| + | ''Floor tiles cover up wires and pipes.'' |
||
| + | ''You can also construct wooden and other floors the same way.''{{divhide|end}}{{divhide|Deconstruction|color=#FFB9AA}} |
||
| + | |||
| + | # Use a crowbar on the floor tile. |
||
| + | {{divhide|end}} |
||
| + | |- |
||
| + | |[[File:lightfloor.gif]] Floor Light ||312 steel, 312 glass in autolathe |
||
| + | |[[File:screwdriver_tool.png]]Screwdriver |
||
| + | [[File:Autolathe_n.gif]] Autolathe |
||
| + | | Created in the autolathe then dragged to a plating, use screwdriver to secure. |
||
| + | |} |
||
| + | |||
| + | ===Walls=== |
||
| + | |||
| + | {| class="wikitable" style="width: 75%;" |
||
| + | ! colspan="4" | Walls |
||
| + | |- |
||
| + | ! width="150px" | Construction |
||
| + | ! width="200px" | Requires |
||
| + | !Tools |
||
| + | ! |
||
| + | |- |
||
| + | |[[File:Wall_new.png]] Regular Wall || 4x [[File:metal.png]] |
||
| + | '''OR''' |
||
| + | |||
| + | 2x [[File:metal.png]] and any 2x stacked material. |
||
| + | | |
||
| + | | {{divhide|Construction|color=#AEE9FF}} |
||
| + | # [[File:metal.png]] Use metal to make wall girders. |
||
| + | # [[File:metal.png]] or [[File:metal_r.png]] use metal or plasteel on the girders to make the wall. |
||
| + | {{divhide|end}}{{divhide|Deconstruction|color=#FFB9AA}} |
||
| + | # [[File:Welderon 32px.gif]] Welder. |
||
| + | # [[File:wrench.png]] Wrench the remaining girder. |
||
| + | {{divhide|end}} |
||
| + | |- |
||
| + | |[[File:Armored_wall.png]] Reinforced Wall || 2x [[File:metal.png]], 4x [[File:metal_r.png]] |
||
| + | '''OR''' |
||
| + | |||
| + | 2x[[File:metal.png]]any 4x stacked material, |
||
| + | | |
||
| + | | {{divhide|Construction|color=#AEE9FF}} |
||
| + | # [[File:metal.png]] Use metal to make wall girders. |
||
| + | # [[File:metal.png]] or [[File:metal_r.png]] use metal or plasteel on the girders to make the wall. |
||
| + | # [[File:screwdriver_tool.png]] Screwdriver girder to enable reinforcement. |
||
| + | # [[File:metal.png]] or [[File:metal_r.png]] use metal or plasteel to reinforce the girders. Does not effect final wall strength. |
||
| + | # [[File:metal.png]] or [[File:metal_r.png]] use metal or plasteel to finish the wall. Does effect final wall strength. |
||
| + | {{divhide|end}}{{divhide|Deconstruction|color=#FFB9AA}} |
||
| + | # [[File:wirecutters.png]] Wirecutters. |
||
| + | # [[File:screwdriver_tool.png]] Screwdriver. |
||
| + | # [[File:Welderon 32px.gif]] Welder. |
||
| + | # [[File:crowbar.png]] Crowbar. |
||
| + | # [[File:wrench.png]] Wrench. |
||
| + | # [[File:Welderon 32px.gif]] Welder. |
||
| + | # [[File:crowbar.png]] Crowbar. |
||
| + | # [[File:screwdriver_tool.png]] Screwdriver. |
||
| + | # [[File:wirecutters.png]] Wirecutters. |
||
| + | # [[File:wrench.png]] Wrench the remaining girder. |
||
| + | {{divhide|end}} |
||
| + | |- |
||
| + | |[[File:GrilleNew.png]] Grille || 2x [[File:rods.png]] |
||
| + | ||| {{divhide|Construction|color=#AEE9FF}} |
||
| + | # [[File:rods.png]] Use rods to create a grille. |
||
| + | {{divhide|end}}{{divhide|Deconstruction|color=#FFB9AA}} |
||
| + | # [[File:wirecutters.png]] Wirecut to dissassemble. |
||
| + | {{divhide|end}}{{divhide|Extra|color=#E6EEFF}} |
||
| + | * [[File:CableCoils.png]] You can place a powered wire underneath to electrify the grille. |
||
| + | * [[File:wrench.png]] You can wrench the grille to unanchor or reanchor it so it can be moved. |
||
| + | {{divhide|end}} |
||
| + | |- |
||
| + | |[[File:Frame.png]] Low Wall || 2x [[File:metal.png]], 4x [[File:Glass_r.png]], 2x [[File:rods.png]] |
||
| + | ||| {{divhide|Construction|color=#AEE9FF}} |
||
| + | # [[File:metal.png]] Use metal sheets to create the low wall. |
||
| + | # [[File:rods.png]] Use rods on the low wall to add a grille. |
||
| + | # [[File:Glass_r.png]] Use glass on the low wall to add a window. |
||
| + | # [[File:screwdriver_tool.png]] Screw the window into place. |
||
| + | # [[File:crowbar.png]] Pry the window into the frame. |
||
| + | # [[File:screwdriver_tool.png]] Screw the window into the frame. |
||
| + | {{divhide|end}}{{divhide|Deconstruction|color=#FFB9AA}} |
||
| + | # [[File:screwdriver_tool.png]] Unscrew the window from the frame. |
||
| + | # [[File:crowbar.png]] Pry the window out of the frame. |
||
| + | # [[File:screwdriver_tool.png]] Unscrew the window from the frame. |
||
| + | # [[File:wrench.png]] Deconstruct the window. |
||
| + | # [[File:wirecutters.png]] Cut the grilles. |
||
| + | # [[File:wrench.png]] Deconstruct the low wall. |
||
| + | {{divhide|end}}{{divhide|Extra|color=#E6EEFF}} |
||
| + | * [[File:CableCoils.png]] You can place a powered wire underneath to electrify the grille. |
||
| + | * [[File:wrench.png]] You can wrench the grille to unanchor or reanchor it so it can be moved. |
||
| + | {{divhide|end}} |
||
| + | |} |
||
| + | |||
| + | ===Glass=== |
||
| + | |||
| + | {| class="wikitable" style="width: 75%;" |
||
| + | ! colspan="3" | Glass |
||
| + | |- |
||
| + | ! width="150px" | Construction |
||
| + | ! width="200px" | Requires |
||
| + | ! |
||
| + | |- |
||
| + | |[[File:Glass_panel.png]] Glass Panel|| 1x[[File:Glass.png]],[[File:screwdriver_tool.png]] || Click on the glass sheet, select one directional. Right-click the panel to rotate. Use screwdriver to complete construction. You can also left-click a grille with the glass sheet to place directly on the grille. |
||
| + | |- |
||
| + | |[[File:Glass_full.png]] Full Glass|| 2x[[File:Glass.png]],[[File:screwdriver_tool.png]] || Click on the glass sheet, select full. Use screwdriver to complete construction. |
||
| + | |- |
||
| + | |[[File:Glass_panelr.png]] Reinforced Glass Panel|| 1x[[File:Glass_r.png]],[[File:screwdriver_tool.png]],[[File:crowbar.png]] || Click on the glass sheet, select one directional. Right-click the panel to rotate. Use the following sequence to complete construction: |
||
| + | [[File:screwdriver_tool.png]] Screwdriver , |
||
| + | [[File:crowbar.png]] Crowbar, |
||
| + | [[File:screwdriver_tool.png]] Screwdriver. Reverse to deconstruct. |
||
| + | |||
| + | You can also left-click a grille with the glass sheet to place directly on the grille. |
||
| + | |- |
||
| + | |[[File:Glass_fulllr.png]] Reinforced Full Glass|| 2x[[File:Glass_r.png]],[[File:screwdriver_tool.png]],[[File:crowbar.png]] || Click on the glass sheet, select full. Use the following sequence to complete construction: |
||
| + | [[File:screwdriver_tool.png]] Screwdriver , |
||
| + | [[File:crowbar.png]] Crowbar, |
||
| + | [[File:screwdriver_tool.png]] Screwdriver. Reverse to deconstruct. |
||
| + | |} |
||
| + | |||
| + | ===Airlocks=== |
||
| + | |||
| + | {| class="wikitable" style="width: 75%;" |
||
| + | ! colspan="3" | Airlocks & Doors |
||
| + | |- |
||
| + | ! width="150px" | Construction |
||
| + | ! width="200px" | Requires |
||
| + | ! |
||
| + | |- |
||
| + | |[[File:Airlock.png]] Airlock|| 4x [[File:metal.png]],1x[[File:Glass_r.png]],[[File:screwdriver_tool.png]],[[File:wrench.png]],[[File:CableCoils.png]],[[File:circuitboard.png]] || {{divhide|Construction|color=#AEE9FF}} |
||
| + | # [[File:metal.png]] Use metal to make an airlock assembly. |
||
| + | # [[File:wrench.png]] Wrench airlock assembly in place. |
||
| + | # (Optional) Use a pen to name the airlock. |
||
| + | # (Optional) [[File:Glass_r.png]] Add reinforced glass to make a glass airlock. |
||
| + | # [[File:CableCoils.png]] Add wires to assembly. |
||
| + | # [[File:circuitboard.png]] Unlock the airlock control board with an ID card, and use it in hand to set the access levels. |
||
| + | # [[File:circuitboard.png]] Add airlock control board to assembly. |
||
| + | # [[File:screwdriver_tool.png]] Screwdriver to finish. |
||
| + | {{divhide|end}}{{divhide|Deconstruction|color=#FFB9AA}} |
||
| + | # [[File:screwdriver_tool.png]] Screwdriver the door. |
||
| + | # Use multitool and wirecutters to disable everything except the doorbolts as detailed [[Hacking|here]]. Doorbolts must be up for this to work. |
||
| + | # [[File:Welderon 32px.gif]] Weld the door shut. |
||
| + | # [[File:crowbar.png]] Crowbar the electronics out. (if the door is electrified, this won't work for some reason) |
||
| + | # [[File:wirecutters.png]] Wirecut the wires out. |
||
| + | # [[File:wrench.png]] Unsecure it with a wrench. |
||
| + | # [[File:Welderon 32px.gif]] Weld it to deconstruct to metal plates. |
||
| + | |||
| + | If the airlock is unpowered and the bolts are down: |
||
| + | # [[File:Fireaxe0.png]] Hit the airlock with a fire axe or other weapon to break it. |
||
| + | # [[File:Welderon 32px.gif]] Use a welder to cut the door bolts. |
||
| + | # Follow the steps above. |
||
| + | |||
| + | {{divhide|end}} |
||
| + | |- |
||
| + | |[[File:Hazard airlock.png]] Emergency Shutter|| 4x [[File:metal.png]],[[File:wrench.png]],[[File:CableCoils.png]],[[File:circuitboard.png]] || {{divhide|Construction|color=#AEE9FF}} |
||
| + | # [[File:metal.png]] Use metal to make an airlock assembly. |
||
| + | # [[File:wrench.png]] Wrench airlock assembly in place. |
||
| + | # [[File:CableCoils.png]] Add wires to assembly. |
||
| + | # [[File:circuitboard.png]] Add air alarm circuit board to assembly. |
||
| + | {{divhide|end}}{{divhide|Deconstruction|color=#FFB9AA}} |
||
| + | # [[File:screwdriver_tool.png]] Screwdriver the shutter to open it's hatch. |
||
| + | # [[File:Welderon 32px.gif]] Weld the shutter closed. |
||
| + | # [[File:crowbar.png]] Crowbar the Electronics out. |
||
| + | # [[File:wrench.png]] Wrench the shutter assembly to unsecure it. |
||
| + | # [[File:Welderon 32px.gif]] Weld the unsecured assembly to disassemble it into sheets of metal. |
||
| + | {{divhide|end}} |
||
| + | |- style="vertical-align: top;" |
||
| + | |[[File:windoor.png]] Window Door|| 5x[[File:Glass_r.png]],4x [[File:rods.png]],[[File:wrench.png]],[[File:CableCoils.png]],[[File:screwdriver_tool.png]],[[File:crowbar.png]],[[File:circuitboard.png]] || {{divhide|Construction|color=#AEE9FF}} |
||
| + | # [[File:Glass_r.png]] Click on reinforced glass and click "windoor." |
||
| + | # [[File:wrench.png]] Use a wrench to secure. |
||
| + | # [[File:rods.png]] (Optional) Add rods to make a secure windoor |
||
| + | # [[File:CableCoils.png]] Add wires |
||
| + | # [[File:circuitboard.png]] Unlock the airlock control board with an ID card, and use it in hand to set the access levels. |
||
| + | # [[File:circuitboard.png]] Add airlock control board to assembly. |
||
| + | # [[File:crowbar.png]] Use a crowbar to finish the assembly. |
||
| + | {{divhide|end}} |
||
| + | |- |
||
| + | |[[File:false_wall.gif]] Regular Hidden Door|| 4x [[File:metal.png]], [[File:crowbar.png]] || Use metal and create a wall girder. Use a crowbar on the girder, then place the rest of the metal. |
||
| + | |||
| + | '' You can also deconstruct a wall to the girder state, then start this construction to turn an existing wall into a hidden door. '' |
||
| + | |- |
||
| + | |[[File:false_wallr.gif]] Reinforced Hidden Door|| 2x [[File:metal.png]],2x [[File:Metal_r.png]], [[File:crowbar.png]] || Use metal and create a wall girder. Use a crowbar on the girder, then place the reinforced metal. |
||
| + | |} |
||
==Laying Pipes== |
==Laying Pipes== |
||
Revision as of 03:17, 1 November 2019
Status: Ported construction from bay12, currently testing all construction methods for corrections
Technomancers
The Technomancers and their Exultant were hired by the Captain to maintain the equipment and engine of the CEV "Eris." They were given the engineering section of the ship as their home for the journey. As per the agreement, the Technomancers will keep the ship's hull integrity and power at maximum capacity while repairing any hull breaches with no payment given aside from their salary. However, Technomancers may charge for cosmetic repairs or new additions to the vessel. For more information on the Technomancers, please see The Technomancer League
If you are looking how to set up the engine see this Guide to the Engine
Construction
All Technomancers and their Exultant must know how to build and repair the ship. This section will give you the knowledge of construction, deconstruction, and repair for anyone even the lowly vagabond to learn the basics of Technomancy.
Machines
Structural
Flooring
| Floors | |||
|---|---|---|---|
| Construction | Materials | Tools | Method |
| File:Lattice.png Lattice | 1x  Rod Rod
|
File:Welderon 32px.gifWelding tool | Construction
Deconstruction
|
| File:Catwalk1.jpg Catwalk | 1x 
|
Construction
Deconstruction
| |
| File:Plating.png Plating | 1x File:Floor Tiles.pngRegular floortile | File:Welderon 32px.gif Welding tool | Construction
Blocks air and can be used for further construction. Deconstruction
Repair
|
| File:Floor.png Floor | 1x File:Floor Tiles.pngany floor tile | Crowbar | Construction
Floor tiles cover up wires and pipes. You can also construct wooden and other floors the same way.Deconstruction
|
| File:Lightfloor.gif Floor Light | 312 steel, 312 glass in autolathe |  Screwdriver Screwdriver
File:Autolathe n.gif Autolathe |
Created in the autolathe then dragged to a plating, use screwdriver to secure. |
Walls
| Walls | |||
|---|---|---|---|
| Construction | Requires | Tools | |
| File:Wall new.png Regular Wall | 4x File:Metal.png
OR 2x File:Metal.png and any 2x stacked material. |
Construction
Deconstruction
| |
| File:Armored wall.png Reinforced Wall | 2x File:Metal.png, 4x File:Metal r.png
OR 2xFile:Metal.pngany 4x stacked material, |
Construction
Deconstruction
| |
| File:GrilleNew.png Grille | 2x 
|
||
| File:Frame.png Low Wall | 2x File:Metal.png, 4x  , 2x , 2x 
|
Construction
Deconstruction | |
Glass
| Glass | ||
|---|---|---|
| Construction | Requires | |
| File:Glass panel.png Glass Panel | 1x , , |
Click on the glass sheet, select one directional. Right-click the panel to rotate. Use screwdriver to complete construction. You can also left-click a grille with the glass sheet to place directly on the grille. |
| File:Glass full.png Full Glass | 2x , , |
Click on the glass sheet, select full. Use screwdriver to complete construction. |
| File:Glass panelr.png Reinforced Glass Panel | 1x , , , , |
Click on the glass sheet, select one directional. Right-click the panel to rotate. Use the following sequence to complete construction:
You can also left-click a grille with the glass sheet to place directly on the grille. |
| File:Glass fulllr.png Reinforced Full Glass | 2x , , , , |
Click on the glass sheet, select full. Use the following sequence to complete construction: |
Airlocks
| Airlocks & Doors | ||
|---|---|---|
| Construction | Requires | |
| File:Airlock.png Airlock | 4x File:Metal.png,1x , , , , , , ,File:Circuitboard.png ,File:Circuitboard.png |
Construction
Deconstruction
If the airlock is unpowered and the bolts are down:
|
| File:Hazard airlock.png Emergency Shutter | 4x File:Metal.png, , , ,File:Circuitboard.png ,File:Circuitboard.png |
Construction
Deconstruction
|
| File:Windoor.png Window Door | 5x ,4x ,4x  , , , , , , , , ,File:Circuitboard.png ,File:Circuitboard.png |
Construction
|
| File:False wall.gif Regular Hidden Door | 4x File:Metal.png,  |
Use metal and create a wall girder. Use a crowbar on the girder, then place the rest of the metal.
You can also deconstruct a wall to the girder state, then start this construction to turn an existing wall into a hidden door. |
| File:False wallr.gif Reinforced Hidden Door | 2x File:Metal.png,2x File:Metal r.png,  |
Use metal and create a wall girder. Use a crowbar on the girder, then place the reinforced metal. |
Laying Pipes
The Thrusters
If you are looking for the Engine Ritual you have come to the wrong place!
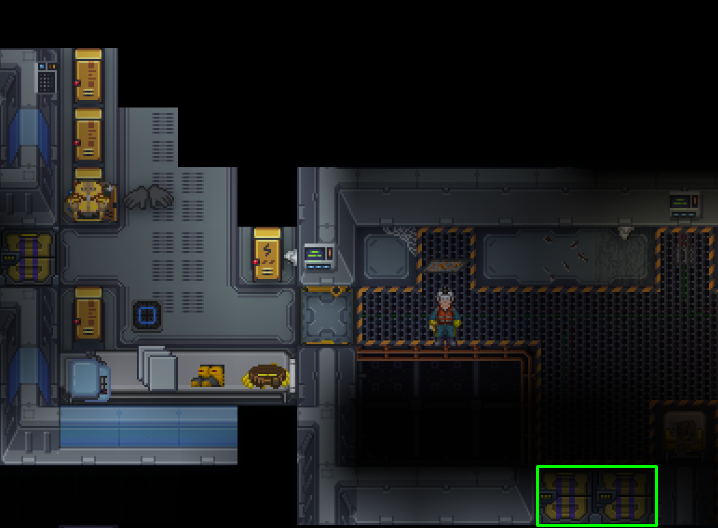
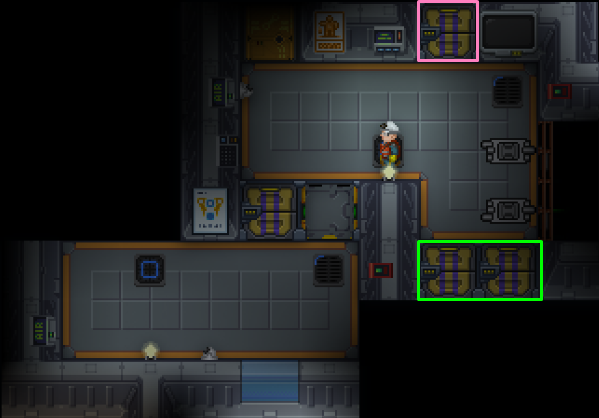
The CEV "Eris" is a space ship. It may not look like it, but it is. To fly through space it obviously needs thrusters, these thrusters are maintained by the Technomancers aboard. There are two thruster rooms for both sets of thrusters aboard the ship. For the inevitable Captain who may fly the ship without understanding his ship, your job will be to maintain them.
The Green Squares indicate the airlocks towards the Thruster room, the pink one indicates the shield and gravity generator airlock.
Refueling
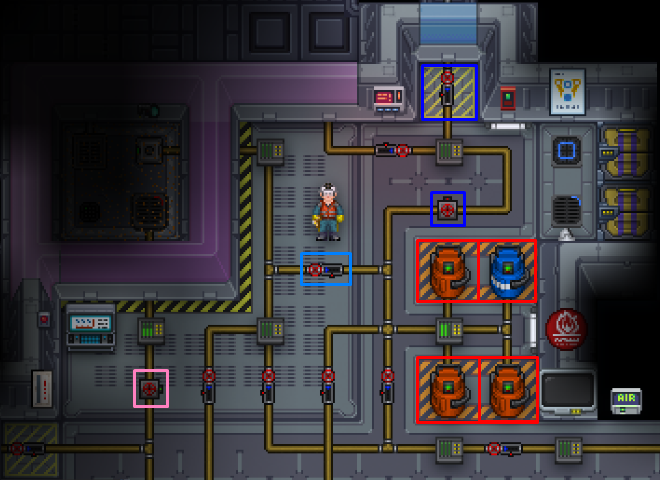
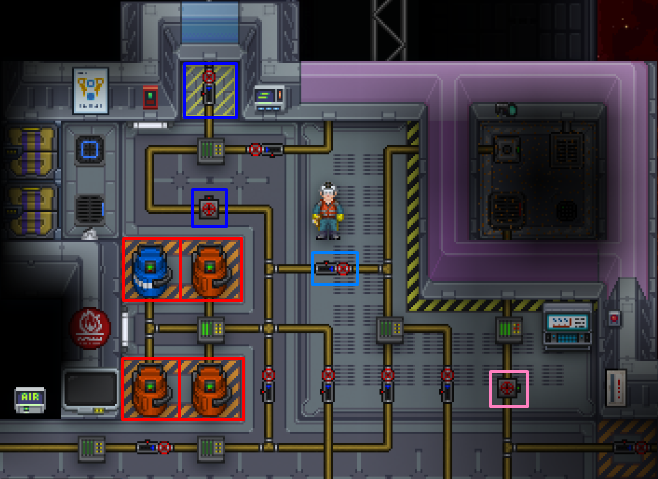
When the time comes of CEV "Eris" drifting through space, you will need to refuel the thrusters immediately, lest you hear the ominous announcements of Meteor's incoming forever. Before getting started, know the color coding for the following images.
- Red: Your fuel
- Light Blue: Main Pump
- Bright Blue: Vent Pump
- Pink: Fuel Valve
Each Thruster room is the same, just switched depending on which side of the ship you are on. To refuel the ship, you simply need to flood plasma into the borosilicate rooms as seen in the images.
Select your fuel, nominally it is plasma, and open the canister you are going to use to fuel. Then Open the valve (Light Blue) to begin pumping plasma into the mixing chamber.
You have just refueled the ship. However, always remember to keep the Fuel Valve OPEN (Pink) and it will be indicated as so if there is a green or red light.
Things to Note: You can ignite the fuel for more thrust, and even mix O2 into it, essentially the hotter it is, the more thrust you will obtain. However it is quite unsafe as doing so without knowing how fire works can lead to a plasma leak or worse, the detonation of the Thrusters.
Refuelling Plasma Canisters
Whenever you have expended the plasma canisters located in the Thrusters room, you may need to refuel them. To refuel the canisters wrench an empty canister to the Connector Port and open the canister. Afterwards, open the valve marked in dark green. Then just wait for the canister to be refuelled.
Note: Do not open the canister if it is not wrenched to a connector port unless you want to release plasma into the air
Experimenting
This section of the wiki is simply for those contributing to their discoveries, be they setting up the singularity generator or building a mining outpost on the asteroid. They are player created guides and not official, so experimenting with these are at your own risk. But what is a technomancer without risk?


