Difference between revisions of "Supermatter Engine ErisEn"
m (working on a better guide) |
(rewrote it somewhat, made it better) |
||
| Line 12: | Line 12: | ||
=Supermatter Setup= |
=Supermatter Setup= |
||
[[File:NewEngine.png|thumb|Main Coolant Pipes]] |
[[File:NewEngine.png|thumb|Main Coolant Pipes]] |
||
| − | [[File: |
+ | [[File:Enginenew.png|thumb|Waste Control]] |
[[File:Engine_upper.png|thumb|Upper Floor]] |
[[File:Engine_upper.png|thumb|Upper Floor]] |
||
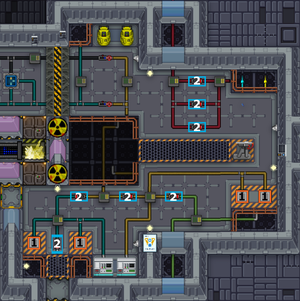
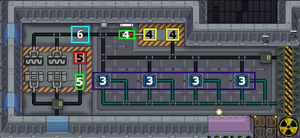
#Wrench the '''Plasma''' canisters in the ports marked with <span style="color:#FFA500">'''Orange'''</span> '''(1)''' squares. |
#Wrench the '''Plasma''' canisters in the ports marked with <span style="color:#FFA500">'''Orange'''</span> '''(1)''' squares. |
||
| + | #*'''Plasma''' is a superior option as it has highest heat capacity. Using other gases highly unrecommended. |
||
#Max out and turn on the pumps marked in <span style="color:#87CEEB">'''Light Blue'''</span> '''(2)''' so that the gas flows freely through the loops. |
#Max out and turn on the pumps marked in <span style="color:#87CEEB">'''Light Blue'''</span> '''(2)''' so that the gas flows freely through the loops. |
||
#Make sure that omni-filters, shown in <span style="color:#000080">'''Dark Blue'''</span>'''(3)''' squares, do not filter '''Plasma'''. These filters should be in the correct configuration on round start. |
#Make sure that omni-filters, shown in <span style="color:#000080">'''Dark Blue'''</span>'''(3)''' squares, do not filter '''Plasma'''. These filters should be in the correct configuration on round start. |
||
| Line 25: | Line 26: | ||
| − | ==Power grid |
+ | ==Power grid== |
| − | Head to the upper floor and interact with the console closest to the switches ( |
+ | Head to the upper floor and interact with the console closest to the switches (<span style="color:#FFA500">'''Orange'''</span>). Exit the Power Monitoring and open RCON Remote Control. |
| + | |||
| − | [[File:Rcon.png|thumb|Right|This how your RCON setup should look on most SMES units]] |
||
| + | * Set every Substation '''Input to 450 - AUTO''' and '''Output 400 - ONLINE ''EXCEPT''''' Engineering substation - turn on its bypass instead. |
||
| ⚫ | |||
| + | ** Instead of turning on Engineering substation bypass you can upgrade the '''SMES''' (explained below) unit. Doing neither is '''highly''' unrecommended - whole ship is powered through Engineering substation. |
||
| ⚫ | |||
| + | |||
| ⚫ | |||
| + | == Shields == |
||
| + | Shield generator is located east of the lobby (go on the catwalk, then upstairs and north into airlock dubbed "Generator Room") but it is possible to edit Shield Generator settings using remote control program using on of the upper floor consoles or a laptop. |
||
| + | |||
| + | * Set '''Field Range''' to maximum possible - '''200'''. |
||
| + | * Set '''Input Cap''' to something big - '''3000 or 5000''' kW should do. |
||
| + | ** Too low input cap will make shield generator passively lose power. |
||
| + | * Turn on the following modesː |
||
| + | ** '''Hyperkinetic Projectiles''' to stop incoming meteors. |
||
| + | ** '''Unknown Lifeforms''' to stop angry mobs. |
||
| + | ** '''Hull Shielding''' to make shield envelop the ship instead of projecting a large bubble. |
||
| + | ** '''Multi-Dimensional Field Warp''' to make shield cover the whole ship instead of single deck. |
||
| + | ** '''Atmospheric Containment''' to stop breaches from depressurizing the ship. |
||
| + | *** Most modes are self-explanatory. |
||
| + | *** Multiplies are power consumption multipliers - if you use many modes it is recommended to set '''Input Cap''' even higher. |
||
| + | |||
| + | And finally, press the '''Turn on''' button. |
||
| + | |||
| ⚫ | |||
| + | |||
| ⚫ | |||
| ⚫ | |||
The core power generation is done by the Thermo-Electric Generators (TEGs). There are four in the engine, and they are powered by the flow of two gasses of differing temperature through their two sides. The larger the temperature difference, the more power generated. Note that they are less efficient when generating more than 500kW, but are not harmed by doing so, despite the intermittent sparks generated. |
The core power generation is done by the Thermo-Electric Generators (TEGs). There are four in the engine, and they are powered by the flow of two gasses of differing temperature through their two sides. The larger the temperature difference, the more power generated. Note that they are less efficient when generating more than 500kW, but are not harmed by doing so, despite the intermittent sparks generated. |
||
| − | ===Gas Loops |
+ | ===Gas Loops=== |
There are two gas loops in the engine, the cold loop and the hot loop. By mixing in the generator, the temperature of the gasses are equalized somewhat, so the hotter gas should be reheated, and the cooler gas should be cooled. This is where the supermatter comes in. The cold loop flows from red pipe, to generators, to the green pipe, then out to radiators in space to cool back down. The hot loop flows from yellow pipe, to blue pipe, then into the supermatter chamber to be reheated. The supermatter, when excited, produces a large amount of heat, and will probably burn some of the plasma in the hot loop. In order to remove the products of this combustion, everything except plasma is filtered from the hot loop. |
There are two gas loops in the engine, the cold loop and the hot loop. By mixing in the generator, the temperature of the gasses are equalized somewhat, so the hotter gas should be reheated, and the cooler gas should be cooled. This is where the supermatter comes in. The cold loop flows from red pipe, to generators, to the green pipe, then out to radiators in space to cool back down. The hot loop flows from yellow pipe, to blue pipe, then into the supermatter chamber to be reheated. The supermatter, when excited, produces a large amount of heat, and will probably burn some of the plasma in the hot loop. In order to remove the products of this combustion, everything except plasma is filtered from the hot loop. |
||
Oxygen in the hot loop is a very bad idea - it leads to fires, which can rapidly raise the core temperature to dangerous levels. |
Oxygen in the hot loop is a very bad idea - it leads to fires, which can rapidly raise the core temperature to dangerous levels. |
||
| − | === |
+ | ===Notes=== |
The plasma setup can withstand EER up to 1500+. You can simply just leave emitter on since it's bottlenecks at ~1400. Setups with other gases aren't as safe - you'll want to do a few shots, maybe 6-12 depending on the gas. |
The plasma setup can withstand EER up to 1500+. You can simply just leave emitter on since it's bottlenecks at ~1400. Setups with other gases aren't as safe - you'll want to do a few shots, maybe 6-12 depending on the gas. |
||
| Line 43: | Line 65: | ||
TEG power output depends on the difference between the temperature of the loops, and the heat capacity of the gas mix in the loops. While the hot loop doesn't get particularly hot with a pure plasma setup, it still generates vastly more power due to the high heat capacity, meaning it's bother safer and outputs more energy. |
TEG power output depends on the difference between the temperature of the loops, and the heat capacity of the gas mix in the loops. While the hot loop doesn't get particularly hot with a pure plasma setup, it still generates vastly more power due to the high heat capacity, meaning it's bother safer and outputs more energy. |
||
| + | If you want to upgrade a SMES [[File:SMES.png|32x32px]] unit, follow the guide belowː |
||
| − | It's also a good idea to upgrade the two SMES units (the ones side by side in the computer picture) using the parts in one of the crates south of them. Otherwise tinkering with shield input power could prevent needed substations from getting proper power applied. To upgrade them, follow the small guide below.[[File:SMES.png]] |
||
*Turn off the charge mode for both SMES units and wait for it to hit zero. |
*Turn off the charge mode for both SMES units and wait for it to hit zero. |
||
| − | *Power off the SMES unit completely and open the maintenance hatch with a screwdriver |
+ | * Power off the SMES unit completely and open the maintenance hatch with a screwdriver |
| − | * |
+ | *Stuff one of each of the given SMES coils into both units |
| − | *Close the maintenance hatch |
+ | * Close the maintenance hatch |
| − | *Power on both SMES and max out both the charge and output levels |
+ | * Power on both SMES and max out both the charge and output levels |
Remember to download the shield modification program to turn on the shields and explore the extra options as well as tinkering with the input cap. Enabling the engineering section bypass allows the SMES units to charge the shields much faster, and is recommended - but it might be best left till later, as it can be a bit of a power hog while it charges to maximum capacity. |
Remember to download the shield modification program to turn on the shields and explore the extra options as well as tinkering with the input cap. Enabling the engineering section bypass allows the SMES units to charge the shields much faster, and is recommended - but it might be best left till later, as it can be a bit of a power hog while it charges to maximum capacity. |
||
| − | Entering the lower floor once the engine has started should be avoided unless absolutely necessary - the supermatter emits |
+ | Entering the lower floor once the engine has started should be avoided unless absolutely necessary - the supermatter emits '''serious''' amounts of radiation. |
===Fighting the Delamination=== |
===Fighting the Delamination=== |
||
| Line 61: | Line 83: | ||
*Plasma fire tends to rapidly accelerate the delam process. It is advisable to keep oxygen as far away as possible from the SM. If not shut down or welded, the air pumps in the engine room will perpetually pump more O2 to fuel the fire. |
*Plasma fire tends to rapidly accelerate the delam process. It is advisable to keep oxygen as far away as possible from the SM. If not shut down or welded, the air pumps in the engine room will perpetually pump more O2 to fuel the fire. |
||
*The engine room SMES running out of power is a near death sentence - the blast doors will no longer move, the powered pipes will not work, and the emitter will not fire. Use the Pacman in the engine room by wrenching it onto a wire knot, but watch out for overheat. |
*The engine room SMES running out of power is a near death sentence - the blast doors will no longer move, the powered pipes will not work, and the emitter will not fire. Use the Pacman in the engine room by wrenching it onto a wire knot, but watch out for overheat. |
||
| − | * |
+ | *In atmos, there is a pipe labelled "n2 to core." This pipe will be able to pump large amounts of n2 straight into the SM which will abate all but the worst delams. However, atmos runs out of power very fast and is a distance away from the SM. |
| − | = |
+ | =The Thrusters= |
The CEV "Eris" is a space ship. It may not look like it, but it is. To fly through space it obviously needs thrusters, these thrusters are maintained by the Technomancers aboard. There are two thruster rooms for both sets of thrusters aboard the ship. For the inevitable Captain who may fly the ship without understanding his ship, your job will be to maintain them. |
The CEV "Eris" is a space ship. It may not look like it, but it is. To fly through space it obviously needs thrusters, these thrusters are maintained by the Technomancers aboard. There are two thruster rooms for both sets of thrusters aboard the ship. For the inevitable Captain who may fly the ship without understanding his ship, your job will be to maintain them. |
||
| Line 72: | Line 94: | ||
==Refueling== |
==Refueling== |
||
| − | When the time comes of CEV "Eris" drifting through space, you will need to refuel the thrusters immediately, lest you hear the ominous announcements of Meteor's incoming forever. Before getting started, know the color coding for the following images. |
+ | When the time comes of CEV "Eris" drifting through space, you will need to refuel the thrusters immediately, lest you hear the ominous announcements of Meteor's incoming forever. Before getting started, know the color coding for the following images. |
*Red: Your fuel |
*Red: Your fuel |
||
| − | *Light Blue: Main Pump |
+ | * Light Blue: Main Pump |
| − | *Blue: Vent Pump |
+ | * Blue: Vent Pump |
| − | *Pink: Fuel Valve |
+ | * Pink: Fuel Valve |
[[file:ThrustersOne.png|left|300px|thumb|Thruster One]] |
[[file:ThrustersOne.png|left|300px|thumb|Thruster One]] |
||
| Line 98: | Line 120: | ||
'''Note: Do not open the canister if it is not wrenched to a connector port unless you want to release plasma into the air''' |
'''Note: Do not open the canister if it is not wrenched to a connector port unless you want to release plasma into the air''' |
||
| − | =Tips= |
+ | =Tips = |
| − | * |
+ | *Should you accidentally unwrench the Emitter, simply wrench it back in place and weld it onto the platform. It should work again. |
*Opening the 'Waste to Space' valve in the Engine room can offset the issue of the waste canister getting full. |
*Opening the 'Waste to Space' valve in the Engine room can offset the issue of the waste canister getting full. |
||
*Placing the shield on atmospheric containment can alleviate many issue when someone create holes in the ship and reduce the need of using inflatables. |
*Placing the shield on atmospheric containment can alleviate many issue when someone create holes in the ship and reduce the need of using inflatables. |
||
Revision as of 18:22, 27 December 2022
This guide explains the basic roundstart requirements to get the ship running - Supermatter Engine, powergrid settings, Shield Generator and Thrusters setup.
Preparations
To set everything up you need:
- Radiation protection - you need complete full-body protection to avoid radiation poisoning from Supermatter. Technomancer voidsuit will do - examine your armor to see its protection values.
- If the "rad" value in the menu is anything but 100 - it will not be enough.
- Optical Meson Scanner - glasses that protect you from Supermatter hallucinations. They do not have to be turned on.
- Tools - only wrench is required.
- Some MEC stat - without it you will fail numerous times using your tools.
Supermatter Setup
- Wrench the Plasma canisters in the ports marked with Orange (1) squares.
- Plasma is a superior option as it has highest heat capacity. Using other gases highly unrecommended.
- Max out and turn on the pumps marked in Light Blue (2) so that the gas flows freely through the loops.
- Make sure that omni-filters, shown in Dark Blue(3) squares, do not filter Plasma. These filters should be in the correct configuration on round start.
- Wrench the two waste (empty) canisters onto the Yellow (4) squares and turn the Green (4) pump to max and turn it on.
- Wrench a Nitrogen canister to the port in the Red (5) square, turn the Green (5) pump to max and turn it on. Open the Cyan (6) valve.
- Once the canisters in the Orange squares are empty, replace with four more canisters of the same gas.
- Turn on the emitter using one of the switches upstairs or interact with the emitter manually.
Power grid
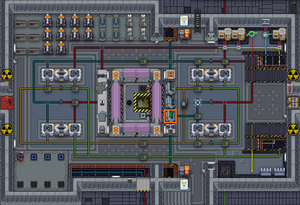
Head to the upper floor and interact with the console closest to the switches (Orange). Exit the Power Monitoring and open RCON Remote Control.
- Set every Substation Input to 450 - AUTO and Output 400 - ONLINE EXCEPT Engineering substation - turn on its bypass instead.
- Instead of turning on Engineering substation bypass you can upgrade the SMES (explained below) unit. Doing neither is highly unrecommended - whole ship is powered through Engineering substation.
Shields
Shield generator is located east of the lobby (go on the catwalk, then upstairs and north into airlock dubbed "Generator Room") but it is possible to edit Shield Generator settings using remote control program using on of the upper floor consoles or a laptop.
- Set Field Range to maximum possible - 200.
- Set Input Cap to something big - 3000 or 5000 kW should do.
- Too low input cap will make shield generator passively lose power.
- Turn on the following modesː
- Hyperkinetic Projectiles to stop incoming meteors.
- Unknown Lifeforms to stop angry mobs.
- Hull Shielding to make shield envelop the ship instead of projecting a large bubble.
- Multi-Dimensional Field Warp to make shield cover the whole ship instead of single deck.
- Atmospheric Containment to stop breaches from depressurizing the ship.
- Most modes are self-explanatory.
- Multiplies are power consumption multipliers - if you use many modes it is recommended to set Input Cap even higher.
And finally, press the Turn on button.
The Principles
The Generators
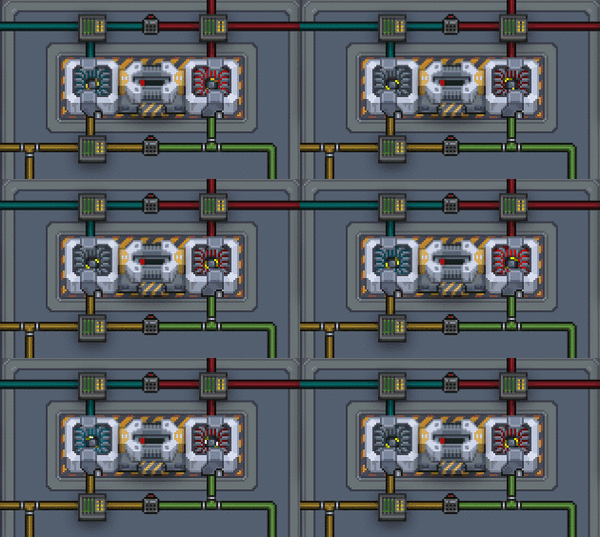
The core power generation is done by the Thermo-Electric Generators (TEGs). There are four in the engine, and they are powered by the flow of two gasses of differing temperature through their two sides. The larger the temperature difference, the more power generated. Note that they are less efficient when generating more than 500kW, but are not harmed by doing so, despite the intermittent sparks generated.
Gas Loops
There are two gas loops in the engine, the cold loop and the hot loop. By mixing in the generator, the temperature of the gasses are equalized somewhat, so the hotter gas should be reheated, and the cooler gas should be cooled. This is where the supermatter comes in. The cold loop flows from red pipe, to generators, to the green pipe, then out to radiators in space to cool back down. The hot loop flows from yellow pipe, to blue pipe, then into the supermatter chamber to be reheated. The supermatter, when excited, produces a large amount of heat, and will probably burn some of the plasma in the hot loop. In order to remove the products of this combustion, everything except plasma is filtered from the hot loop. Oxygen in the hot loop is a very bad idea - it leads to fires, which can rapidly raise the core temperature to dangerous levels.
Notes
The plasma setup can withstand EER up to 1500+. You can simply just leave emitter on since it's bottlenecks at ~1400. Setups with other gases aren't as safe - you'll want to do a few shots, maybe 6-12 depending on the gas.
TEG power output depends on the difference between the temperature of the loops, and the heat capacity of the gas mix in the loops. While the hot loop doesn't get particularly hot with a pure plasma setup, it still generates vastly more power due to the high heat capacity, meaning it's bother safer and outputs more energy.
If you want to upgrade a SMES ![]() unit, follow the guide belowː
unit, follow the guide belowː
- Turn off the charge mode for both SMES units and wait for it to hit zero.
- Power off the SMES unit completely and open the maintenance hatch with a screwdriver
- Stuff one of each of the given SMES coils into both units
- Close the maintenance hatch
- Power on both SMES and max out both the charge and output levels
Remember to download the shield modification program to turn on the shields and explore the extra options as well as tinkering with the input cap. Enabling the engineering section bypass allows the SMES units to charge the shields much faster, and is recommended - but it might be best left till later, as it can be a bit of a power hog while it charges to maximum capacity.
Entering the lower floor once the engine has started should be avoided unless absolutely necessary - the supermatter emits serious amounts of radiation.
Fighting the Delamination
It is typically intensely difficult to completely undo a delamination, but it can be substantially delayed by following a few principles.
- The SM is cooled by gas. The more cool gas it has available, the more stable it will be. If the engine begins to delaminate within the chamber, pumping more cool/room temperature gas will help.
- Plasma fire tends to rapidly accelerate the delam process. It is advisable to keep oxygen as far away as possible from the SM. If not shut down or welded, the air pumps in the engine room will perpetually pump more O2 to fuel the fire.
- The engine room SMES running out of power is a near death sentence - the blast doors will no longer move, the powered pipes will not work, and the emitter will not fire. Use the Pacman in the engine room by wrenching it onto a wire knot, but watch out for overheat.
- In atmos, there is a pipe labelled "n2 to core." This pipe will be able to pump large amounts of n2 straight into the SM which will abate all but the worst delams. However, atmos runs out of power very fast and is a distance away from the SM.
The Thrusters
The CEV "Eris" is a space ship. It may not look like it, but it is. To fly through space it obviously needs thrusters, these thrusters are maintained by the Technomancers aboard. There are two thruster rooms for both sets of thrusters aboard the ship. For the inevitable Captain who may fly the ship without understanding his ship, your job will be to maintain them.
Refueling
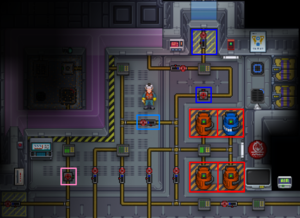
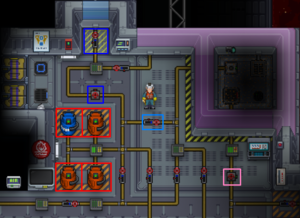
When the time comes of CEV "Eris" drifting through space, you will need to refuel the thrusters immediately, lest you hear the ominous announcements of Meteor's incoming forever. Before getting started, know the color coding for the following images.
- Red: Your fuel
- Light Blue: Main Pump
- Blue: Vent Pump
- Pink: Fuel Valve
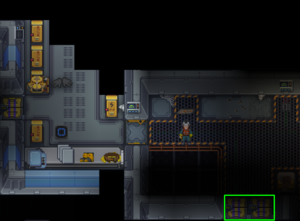
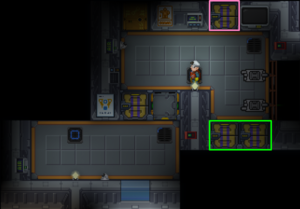
Each Thruster room is the same, just switched depending on which side of the ship you are on. To refuel the ship, you simply need to flood plasma into the borosilicate rooms as seen in the images.
Select your fuel, nominally it is plasma, and wrench the canister to connector port. Then Open the valve (Light Blue) to begin pumping plasma into the mixing chamber.
You have just refueled the ship. However, always remember to keep the Fuel Valve OPEN (Pink) and it will be indicated as so if there is a green or red light.
Things to Note: You can ignite the fuel for more thrust, and even mix O2 into it, essentially the hotter it is, the more thrust you will obtain. However it is quite unsafe as doing so without knowing how fire works can lead to a plasma leak or worse, the detonation of the Thrusters.
Refuelling Plasma Canisters
Whenever you have expended the plasma canisters located in the Thrusters room, you may need to refuel them. To refuel the canisters wrench an empty canister to the Connector Port (Yellow Square). Afterwards, open the valve (Light Red). Then just wait for the canister to be refuelled.
Note: Do not open the canister if it is not wrenched to a connector port unless you want to release plasma into the air
Tips
- Should you accidentally unwrench the Emitter, simply wrench it back in place and weld it onto the platform. It should work again.
- Opening the 'Waste to Space' valve in the Engine room can offset the issue of the waste canister getting full.
- Placing the shield on atmospheric containment can alleviate many issue when someone create holes in the ship and reduce the need of using inflatables.
